Description in Longerware vs Lychee Slicer vs Chitubox - LONGER
Description in Longerware vs Lychee Slicer vs Chitubox

When using the same Longer resin 3D printer, your choice of slicer software can significantly affect print quality, speed, and success rates. Many users ask: What does each parameter in Longerware, Chitubox, and Lychee Slicer mean? Which slicer is best for detailed models or complex prints?

In this guide, we compare Longerware vs Lychee Slicer vs Chitubox using default 25μm printing parameters, helping you make an informed decision and optimize your FDM resin 3D printing workflow.

1. LONGERWARE

Longerware is the official slicer software developed by LONGER, fully optimized for their resin 3D printers.

Key Advantages:

  • Officially optimized parameters reduce print failures

  • Auto-detects printer model and firmware

  • Supports high-precision printing (25μm layer height and finer)

  • Clean and simple user interface, easy for beginners
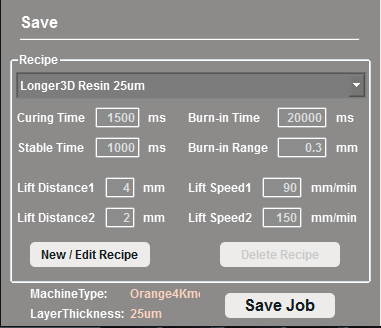
2. Chitubox

Chitubox is one of the most popular third-party slicers, supporting multiple resin 3D printer brands. Its biggest advantage is high customizability, perfect for advanced users.

Key Advantages:

  • Fully customizable supports and print settings

  • Advanced options for exposure time, bottom layers, and print speed

  • Large active community with templates, plugins, and tutorials
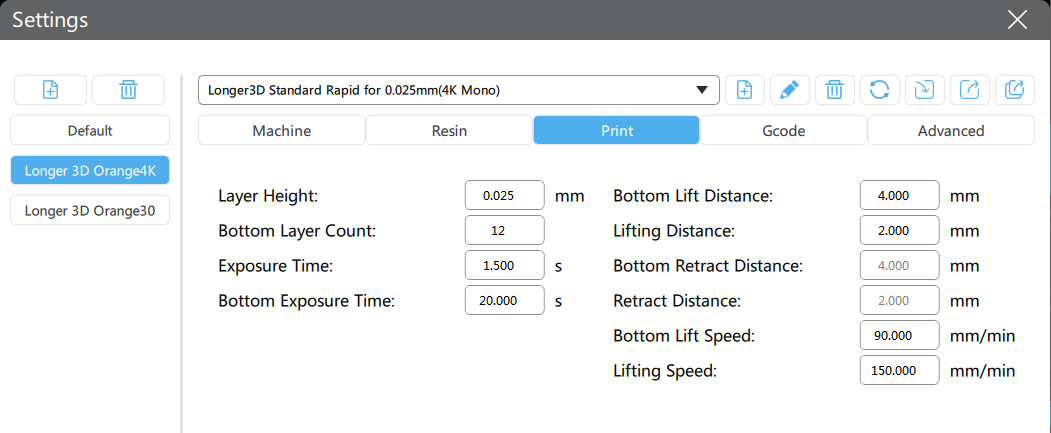
3. Lychee Slicer

Lychee Slicer is known for its smart and intuitive workflow, making it ideal for users who want fast, automated model preparation.

Key Advantages:

  • Auto-generate optimized supports

  • Analyze weak areas of models and provide printing suggestions

  • Layer-by-layer preview to detect potential print issues

  • User-friendly interface, great for quick slicing
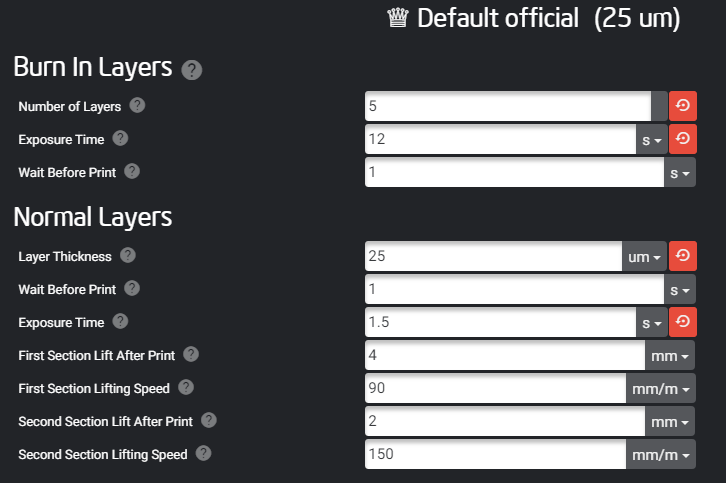
Comparison Table: Longerware vs Chitubox vs Lychee Slicer
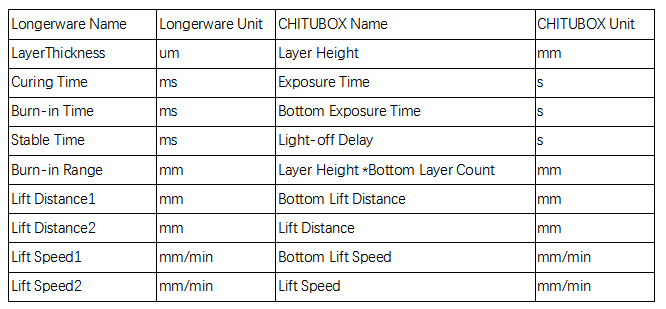
Recommended Printer: Longer Orange 4K

Longer Orange 4K is currently one of the highest-resolution LCD resin 3D printers, with a 6480 × 3840 resolution and subpixel size of 10.5 / 31.5μm, capable of producing extremely detailed models.

Pairing a high-resolution printer like the Orange 4K with the right slicer software—whether Longerware, Chitubox, or Lychee Slicer—can help you achieve professional-grade results.

👉 Learn more and purchase the Orange 4K here:
Longer Orange 4K Resin 3D Printer

Conclusion

Choosing the right slicer is essential for getting the best results from your resin 3D printer. Each software offers distinct advantages depending on your experience level and printing needs:

  • Longerware – Official, stable, and beginner-friendly, ideal for users who want reliable prints without extensive parameter tweaking.

  • Chitubox – Advanced and highly customizable, perfect for fine-tuning supports, exposure, and print settings for complex or detailed models.

  • Lychee Slicer – Intelligent, fast, and user-friendly, excellent for users seeking efficient workflow and automatic support generation.

When combined with a high-resolution printer like the Longer Orange 4K, choosing the right slicer and carefully optimizing your print parameters can dramatically improve print quality. You’ll achieve smoother surfaces, sharper details, reduced print failures, and more consistent results—ultimately taking your resin 3D printing experience to the next level.

By Software | August 25, 2021
LONGER LK4, LONGER LK5 PRO Upgrades【Firmware Update】 - LONGER
LONGER LK4, LONGER LK5 PRO Upgrades【Firmware Update】

This guide explains how to update the firmware for LONGER LK4 Pro and LK5 Pro 3D printers.

Please follow the instructions in order to ensure the firmware update process is completed correctly.

Before You Start

Before updating the firmware, prepare the following:

  • LONGER LK4 Pro or LK5 Pro printer
  • Firmware files
  • TF/Micro SD card
  • Computer
  • USB cable (if required)

Important:
Please ensure the correct firmware version is selected for your specific printer model. Installing an incorrect firmware version may cause abnormal printer behavior.

1.Since the motherboard of the LK4 Pro, LK5 Pro printer is an open source motherboard, use electrical tape to paste the pins on the side of the USB cable socket before connecting to the computer to isolate the computer from supplying power to the printer motherboard. If the pins are not attached, the printer will not work properly use.

2.To connect the computer to the printer, you need to install the driver, which can be installed on the LONGER official website. The official website link is as follows:

https://eu.longer.net/blogs/news/printer-download-guildelines

LONGER 3D firmware download

3.After pasting the pins of the USB cable with tape, you can connect the printer to the computer, and then you need to update the printer's firmware through the slicing software cura.

4.Cura software version 4.8 or 4.9 does not add a LONGER printer by default. You need to add it manually. The following link is the video of adding a LONGER printer to cura4.8 or 4.9. Refer to the video in the link to add a LONGER printer;

MAC OS: https://www.youtube.com/watch?v=XKqRb434USw&t=6s

WINDOWS: https://www.youtube.com/watch?v=jdLYBYFEBlQ&t=9s

If the computer cannot connect to the printer, please refer to the video operation in the link below.

https://www.youtube.com/watch?v=KwmKZmtTOPw&t=10s

5.Next, you need to save the firmware to your computer. The firmware link of the corresponding model is below:

https://drive.google.com/file/d/11X1MZV4ll47kG4dhw2PgXniOwwo7UkmP/view?usp=sharing

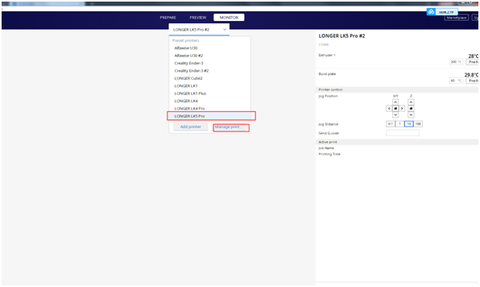
6.After the firmware download is complete, please turn on the printer power, connect the printer to the computer, open the cura software, and select the "MONITOR" page to control the printer. And the firmware update is also completed on this page.

longer 3d - cura solfware

Next, on the "Monitor" page, select the corresponding model to update the firmware, and then click "Manage Printers", the operation is as follows

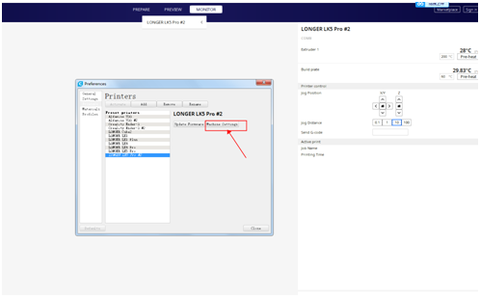
Click "Update Firmware" in the pop-up "Preferences" option box, refer to the figure below.

Firmware upgrade- LONGER 3D

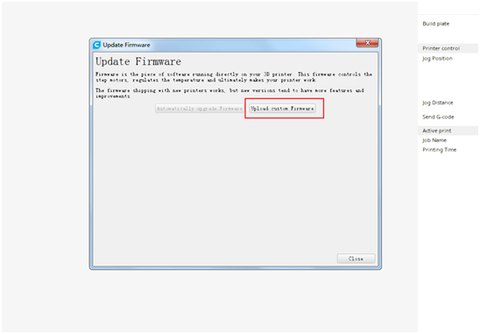
In the pop-up "firmware update" prompt box, click "upload custom firmware"

upload custom firmware

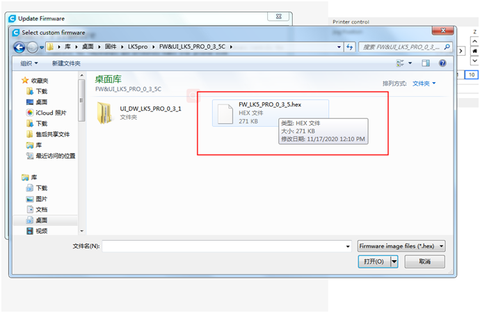
Then select the file with the suffix format ".hex" in the firmware installation package to upload, and you can start to update the printer's firmware. Do not cut off the power of the printer or turn off the computer during the firmware update process, and also ensure that the USB cable is properly connected.

Then select the file with the suffix format ".hex"

LONGER LK5 Pro FDM printer base on 300x300x400mm printed size, if you interested, check the page get more detail: https://eu.longer.net/blogs/academy/longer-lk4-pro-lk5-pro-3d-printer-firmware-update

Troubleshooting

If the firmware update does not complete successfully:

  • Confirm the firmware version matches the printer model
  • Check that files were copied correctly
  • Verify the SD card format
  • Repeat the installation process if needed
By Software | July 23, 2021
FDM 3D printer loss parts, do you know this? - LONGER
FDM 3D printer loss parts, do you know this?

3D printer aways work days and night, as I know, some one have print a model, it cost very long time, funny. for high strength work, some part of FDM 3D printer, will loss. let me show you some part easy loss, you can check while you going to print big project, make sure every thing well before printing.

More than 1000 hour printing?

1, Nozzle kit

nozzle kit of 3d printers

The nozzle kit is installed on the hot end of the printer. There are generally two failure conditions:

  1. The nozzle or blue heat sink is blocked

There are many reasons for being blocked by the filament. For example, if the nozzle is too close to the print bed, the filament cannot be squeezed out. Or when you replaced the new Teflon tube, you did not insert the Teflon tube to the bottom, causing the filament to get stuck in the gap between them.

  1. The thermistor or heating rod is damaged

Generally, their cables are broken. But if the machine is used for a long time, it will naturally wear out.

Buy Longer 3d Printer nozzle kit here: https://eu.longer.net/products/longer-nozzle-kit-for-lk1-lk4-lk4-pro-lk5-pro

2, Limit switch

limit switch of 3d printer

The iron plate on the limit switch will loosen after many collisions. So when your machine has been used for a long time, you need to check whether the limit switch is still working properly.

3, Filament sensor

The filament sensor is a part that is very easy to wear. Its function is to detect whether the filament is used up. So that the printer will not print air when the filament runs out when you are not next to the machine.

filament sensor of 3d printer
After the machine has been used for a long time. The filament sensor may not be able to sense the filament even when there is a filament. So when your printer’s touch screen shows that the filament cannot be sensed, please check your filament sensor.

4, Extruder gear

The brass gear on the extruder may wear out after a long period of filament extrusion. So when your machine has been used for a long time, you need to check whether your extruder gear is worn.

extruder gear

5, Z axis screw

Z-axis screw

After using the machine for a long time, you need to check whether the grease on the Z-axis screw is still enough to keep it working normally.

6, Synchronous belt and Synchronous wheel

Synchronous beltSynchronous wheel

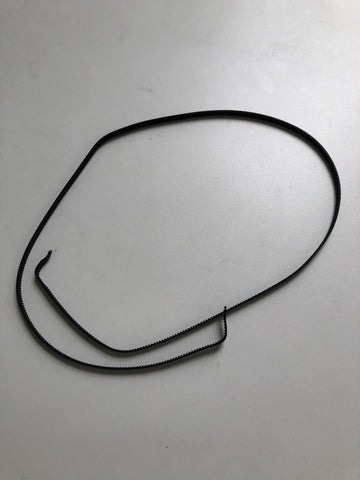
When there is a layer shift in your print or your XY axis cannot move normally. It is very likely that the belt or wheel is worn out (there may be other reasons). You can try a new belt or wheel.

There is a possibility of wear on the surface of the synchronizing wheel and the bearings inside.

https://eu.longer.net/products/lk5-pro-fdm-3d-printer

By Software | June 10, 2021
How to fix extruder in abnormal - LONGER
How to fix extruder in abnormal

If your Longer LK1, LK4, LK4 PRO, or LK5 PRO FDM 3D printer is experiencing extruder issues, it can seriously impact your print quality. Common problems include uneven filament extrusion, stringing, layer gaps, or complete print failure. In this detailed guide, we will walk you through how to troubleshoot and fix an abnormal extruder, step by step, using proven methods that most 3D printing users can follow.

This guide is perfect for Longer 3D printer owners, makers, and hobbyists who want to improve their printer maintenance skills and achieve high-quality, reliable 3D prints.

Common Causes of Extruder Malfunctions

Extruder problems usually stem from two main issues:

1. Clogged Nozzle

A clogged nozzle is the most frequent reason for extrusion problems. Signs include:

  • Filament is not extruding consistently or stops mid-print

  • Stringing or gaps appear in model layers

  • Unusual sounds from the extruder motor

How to fix:
Use the official nozzle cleaning methods provided by Longer, including:

  • Heating the nozzle and manually pushing filament through

  • Using a fine needle or cleaning rod to remove clogs

  • Flushing the nozzle with cleaning filament for stubborn blockages

A clean nozzle ensures smooth and consistent filament flow, reducing print failures.

2. Extruder Motor or Cable Issues

If the nozzle is clear but the extruder still behaves abnormally, the problem may be in the motor, wiring, or motherboard. Follow these steps to troubleshoot:

Step 1: Swap Extruder Cable with X-Axis Cable

  1. Disconnect the extruder cable and X-axis cable, then swap them

  2. Power on the printer and control the X-axis, allowing the extruder to operate

  3. Observe the results:

    • X-axis works properly → Extruder motor is faulty and needs replacement

    • X-axis still does not work → Possible cable or motherboard issue

Step 2: Further Cable and Motherboard Testing

  1. Connect the Y-axis cable to the extruder

  2. Connect the motherboard’s extruder port cable to the X-axis

  3. Test X-axis operation:

    • X-axis works properly → Cables are intact

    • X-axis still fails → Motherboard or cable requires replacement

⚠️ Pro Tips for Safety and Accuracy:

  • Always power off the printer before swapping cables

  • Use official replacement parts to avoid additional damage

  • Check connectors for loose contacts to ensure proper operation

Video Tutorial

For first-time users, watching the official video can make troubleshooting easier:

Watch the detailed extruder troubleshooting video: https://youtu.be/XCjrieoyZ1c

How to Fix Extruder Problems

  1. Start with nozzle cleaning – most extrusion problems are caused by clogs

  2. Check the extruder motor and cables – swap cables to identify faults

  3. Replace faulty parts as needed – motor or motherboard replacement may be necessary

  4. Always follow safety precautions – power off the printer before maintenance

By following these steps, Longer LK1 / LK4 / LK4 PRO / LK5 PRO owners can quickly troubleshoot extruder issues and restore reliable, high-quality printing performance.

Why Proper Extruder Maintenance Matters

Regular maintenance of your FDM 3D printer extruder ensures:

  • Consistent filament flow

  • Sharper model details

  • Reduced print failures

  • Longer printer lifespan

Keeping your extruder in optimal condition is essential for professional-quality 3D printing at home or in a small workshop.

Conclusion

Proper maintenance and troubleshooting of your FDM 3D printer extruder is essential to achieving high-quality and reliable 3D prints. By systematically checking for a clogged nozzle, testing the extruder motor and cables, and replacing faulty parts when necessary, you can quickly restore optimal printer performance.

For Longer LK1, LK4, LK4 PRO, and LK5 PRO owners, following these steps ensures smoother filament flow, sharper model details, and fewer print failures. Regular extruder maintenance not only improves print quality but also extends the lifespan of your 3D printer.

Always remember: safety first—power off your printer before performing any maintenance, and use official Longer replacement parts whenever possible.

By keeping your extruder in top condition, you can confidently tackle complex prints and enjoy a more consistent, professional resin or FDM 3D printing experience.

By Software | March 29, 2021
LONGER LK4 PRO check by yourself guidelines - LONGER
LONGER LK4 PRO check by yourself guidelines

If you own a LONGER LK4 PRO FDM 3D printer, occasional setting issues, mechanical errors, or printing failures may occur. Knowing how to perform a self-check and troubleshoot your printer can save time and prevent unnecessary downtime. This guide covers step-by-step instructions, video resources, and practical tips to keep your printer running smoothly.

Quick Video Guides for LK4 PRO Troubleshooting

To help you address common issues, LONGER provides the following official quick-start videos:

Step-by-Step Self-Check Procedure

If you experience an error or abnormal printer behavior:

  1. Check basic components first:

    • Ensure the nozzle, PTFE tube, and filament are properly installed

    • Inspect cables and connectors for loose connections

  2. Perform axis and motor checks:

    • Test X, Y, and Z movement through the control panel

    • Observe for abnormal noises or skipped steps

  3. Refer to specific video guides for detailed troubleshooting:

    • For hotend issues → Watch “Hotend Components Replacement”

    • For errors → Watch the corresponding Error resolution videos

  4. Stabilize and maintain the machine:

    • Check the base for wobbling and adjust as needed

    • Ensure all screws and mounts are tight

When to Contact Support

If the problem persists after performing the above checks:

Conclusion

Regular self-checks and maintenance on your LONGER LK4 PRO are essential for preventing print failures, saving filament, maintaining accurate X, Y, Z calibration, and extending the lifespan of your printer components. By dedicating a small amount of time to routine checks, you ensure smoother, more reliable prints and reduce hours of troubleshooting.

By Software | February 5, 2021
How to Add LONGER 3D Printers into Cura 4.8 Version - LONGER
How to Add LONGER 3D Printers into Cura 4.8 Version

If you own a LONGER 3D printer such as the LK4, LK4 PRO, or LK5 PRO, setting up the correct slicing profile in Cura 4.8 is essential for achieving high-quality prints. This guide will show you step-by-step how to add your printer, import official resource files, and configure the best printing parameters.

Reach this link to watch how to add LONGER 3D Printers into the latest Cura software. And get more knowledge about longer lk4 pro cura settings, longer lk4 cura settings, and longer lk5 pro cura settings.

Why Add Your LONGER 3D Printer to Cura 4.8?

Adding your printer model to Cura ensures:

Step 1: Download Official Resource Files

  1. Visit the LONGER official resources page >>[Resources files]<<

  2. Download the configuration files corresponding to your printer model

  3. Extract the files to an easily accessible folder

✅ Tip: Always use the latest resource files to ensure perfect print quality and parameter compatibility.

Step 2: Open Cura 4.8 and Add Your Printer

  1. Launch Cura 4.8

  2. Go to “Settings” → “Printer” → “Manage Printers” → “Add Printer”

  3. Select “Custom FDM Printer” and enter your printer name (e.g., LONGER LK4 PRO or LK5 PRO)

Step 3: Import the Configuration Profile

  1. In the printer settings, choose “Import Profile”

  2. Locate the downloaded LONGER resource file

  3. Confirm all parameters are imported, including:

    • Build volume and nozzle diameter

    • Print bed and hotend temperature

    • Printing speed and layer height

Step 4: Save Settings and Test

  1. Save the printer configuration

  2. Slice a test model using the imported profile

  3. Review the slicing preview to ensure no errors

  4. Begin printing once everything is confirmed

Conclusion

Adding your LONGER 3D printer to Cura 4.8 with official resource files ensures high-quality, reliable FDM printing. Correct slicing configuration is key to achieving smooth surfaces, accurate details, and successful prints every time. Always use official LONGER profiles to fully unlock your printer’s potential.

By Software | February 5, 2021