


As the back-to-school season approaches, whether you're a student majoring in art and design, a campus DIY enthusiast, or a young entrepreneur about to launch a small business, a suitable laser engraver could become a powerful tool for your learning, creativity, and hands-on practice. With a wide range of laser engravers on the market, how do you choose the one that suits you best? This article provides a comprehensive guide based on key factors and offers exclusive back-to-school deals to help you purchase your ideal device at a more affordable price.
Laser Module Type Based on Material
Different laser modules are suitable for engraving different materials. If you mainly work with wood, dark acrylic, leather, fabric, leaves, or stone, a blue laser module is an excellent choice. Blue lasers can accurately engrave intricate patterns and textures on these surfaces, making them ideal for wooden crafts or decorative leatherwork.


If you're working with metals like gold, silver, copper, iron, or aluminum, an infrared (IR) laser module is better suited. These high-energy lasers are capable of precise marking and engraving on metal surfaces.
Higher power isn't always better. For beginners working mainly with wood and acrylic, a mid-range power level, such as 10W, is typically sufficient. A 10W blue laser can achieve detailed engraving and cut 8mm basswood in one pass, significantly boosting efficiency.


Entry-Level & Light Projects (thin wood, paper, leather, some acrylic):
Recommended Power: 6W - 10W
Suggested Models: Nano 6W, RAY5 10W
Features: Affordable, compact, desktop-friendly, easy to learn. Great for hobbyists and small handmade projects.


Scenario-Based Model Selection
Usage scenarios also influence your choice of engraver. For home use and large-format creations, an XY-axis motion engraver is ideal. The laser head moves over a fixed work area and is great for large wood panels, full leather sheets, and more.


For small-batch studio production like phone cases, metal tags, and electronics, galvo-style engravers offer much faster engraving. These machines use mirrors to direct the laser beam without moving the workpiece. However, galvo engravers are generally more expensive.
LONGER's laser engravers use optimized hardware and software algorithms to break the traditional XY-axis speed barrier, reaching up to 36,000mm/min. This enables large-scale engraving with near-galvo speeds at a much better price-performance ratio.
Professional & High-Efficiency Use (large format, dense materials, fast cutting):
Recommended Power: 40W+
Suggested Models: B1 40W series
Features: Powerful performance, faster cutting speeds, suitable for heavy-duty tasks and studio production.

Focus on Key Specs: Balancing Precision, Speed, and Power
Precision Affects Quality Engraving precision directly impacts the detail and quality of finished products. For studios or creators with high standards, invest in higher precision models within your budget.
Engraving speed is also crucial for productivity and profitability. Faster engraving means more output in less time—essential for batch orders and customer satisfaction. Different machines offer different speed and precision balances. Choose based on your production needs and budget to ensure both quality and efficiency.
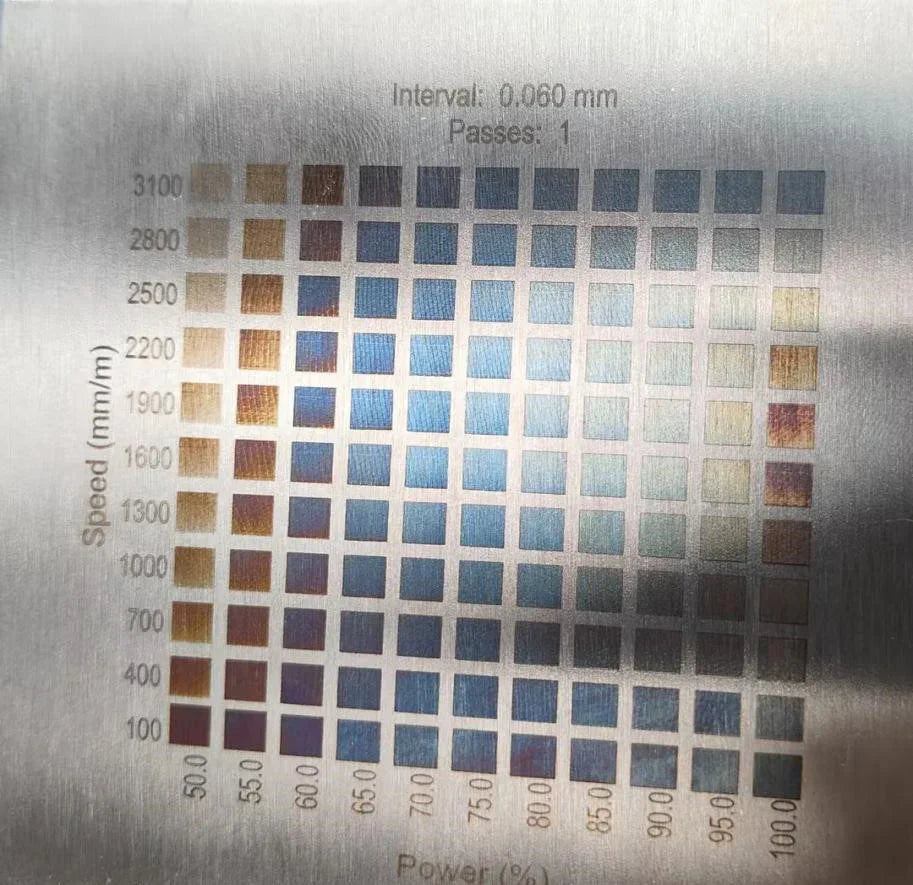
LONGER uses compressed laser spot technology that narrows the beam to just 0.08*0.1mm, enabling ultra-fine detail like hair textures and crisp lines.
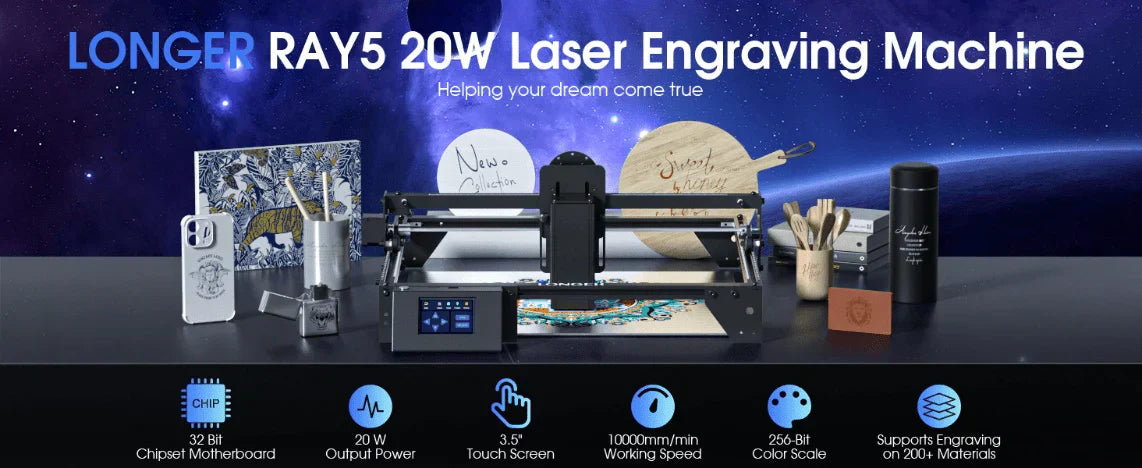
Intermediate & Mainstream Use (thicker wood, dark acrylic, fine engraving, small batch production):
Recommended Power: 20W - 30W
Suggested Models: Ray5 20W series, Nano Pro 12W
Features: Excellent balance of speed, accuracy, and material versatility. Ideal for makerspaces, design students, and small studios.


Consider Safety and User-Friendliness
Safety First As laser engravers emit radiation, choose machines certified as Class 1 Laser Products. These comply with strict safety standards and ensure user protection.
Look for features like:
Enclosed shielding to block light and smoke
Auto power-off in case of errors
Emergency stop buttons
Alarms for abnormal operations
Some models also include protective shields, multiple sensors, exhaust fans, child locks, and more.
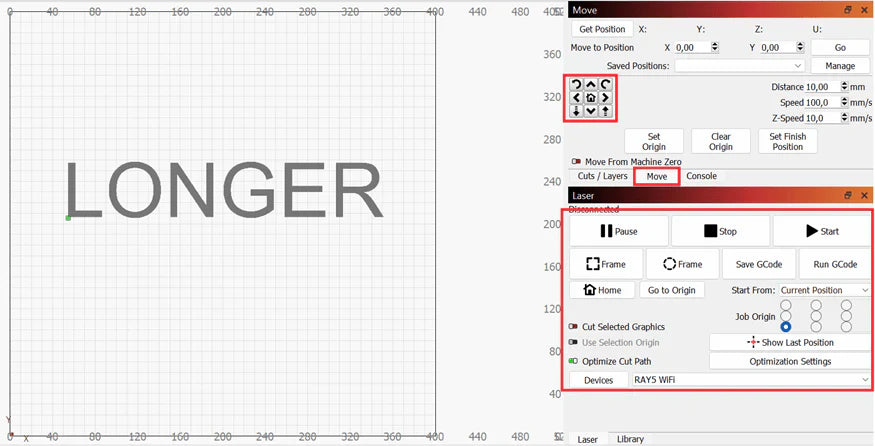
Ease of Use Assembly-free machines greatly improve the user experience. Some engravers require complex setup, which can discourage beginners. Choose plug-and-play models when possible. LONGER emphasizes ease of use with pre-calibrated, ready-to-use machines. Just unbox, plug in, connect to software, and start engraving—no tedious assembly needed.
Product Recommendations: Find Your Perfect Match
Ray5 Series (Best Value)
Ray5 10W: Affordable entry point. Great for learning the basics.
Ray5 20W (Star Product): Best price-to-performance balance.
*Ray5 20W Pro Max (Machine + Honeycomb Panel + Air Pump + Roller): Covers all essentials.
Honeycomb panel protects base, improves airflow.
Air pump clears smoke for better clarity. Roller enables cylindrical engraving.
Back-to-school deal: $499.99 (was $869.99), save $370!
*RAY5 20W Extension Pack (+ Extension Rods): Increases Y-axis space for larger material. Deal: $839.99.


B1 Series (Professional)
B1 40W: High power for serious work.
*B1 40W Pro Max (Machine + Honeycomb + Roller + Camera + Enclosure): Ultimate setup.
Camera allows precise positioning; enclosure improves safety.
Deal: $1099.99
*B1 40W IR + Material Pack (+ IR Head + Material Kit):
Infrared laser head for metal marking, material kit for instant use. Deal: $1289.99


Nano Series (Desktop Precision)
Nano Pro 12W: Ideal for jewelry, electronics, and detailed work.
*Nano Pro Max (Machine + Chuck + Extension Rod):
Chuck enables rotary engraving; rods extend X-axis. Deal: $989.99

Accessory Guide: Upgrade Smart for Better Results
Honeycomb Panel (Highly Recommended!): Protects base, avoids reflection, improves results.
Air Assist (Highly Recommended!): Removes smoke/debris during engraving, enhances line clarity.
Roller: Enables cylindrical engraving (cups, tubes, etc.)
Extension Rods: Expand engraving area.
Camera: (B1 Series) Allows precise design placement.
IR Laser Head: For metal/ceramic marking.
Smoke Purifier: Improves air quality, protects health.
Back-to-School Bundle Tip: Accessories bought separately are often pricier. Back-to-school bundles offer 25%-42% OFF. Choose a package that includes key items like a honeycomb panel and air pump for best value. For example, the Ray5 20W Pro Max's accessory value exceeds the bundle discount.
This back-to-school season, by evaluating your needs, focusing on key specs, prioritizing safety and ease of use, and grabbing the best bundle deals, you can find a high-value laser engraver that supports your learning, creativity, and entrepreneurship. Take action now and start your laser engraving journey today!